CHAPTER 02
VIEWING EM DATA
An EM-equipped fishing vessel automatically records key fishing operations, including times, locations, gear activity, and video. With FishVue Interpret, you can quickly review this information as a synchronized, integrated event log.
This section explains how to open a data set, view different ranges of data, switch between views, and adjust display options.
2.1 Getting Started
FishVue Interpret supports data from numerous EM systems. When you launch FishVue Interpret, the program will prompt you to specify data set to load.
This section explains how to start FishVue Interpret, how to load a data set, and how to access a range of data using the FishVue Interpret interface.
2.1.1 Starting FishVue Interpret
You start FishVue Interpret from Windows just like any other application. When it opens, you will be prompted to select a data set.
To start FishVue Interpret:
- On your desktop, double-click the FishVue Interpret shortcut.
or - From the Start menu, select Programs > Archipelago Marine Research > FishVue Interpret.
After the application launches, you will be asked to choose a data set to load.
2.1.2 Loading a Data Set
Once you launch FishVue Interpret, you will be prompted to specify an EM data set to open. This section describes how to select and load a data set. To load a data set:
NOTE: FishVue Interpret supports encryption to protect EM data. If you try to load an encrypted data set without first installing the correct decryption key for your fishery, FishVue Interpret will deny access. For more information, refer to the user guide provided by Archipelago.
When you start FishVue Interpret, the following window is displayed. If the system data is zipped, choose the “AMR zip file” and if not zipped choose the “Dataset folder” option.
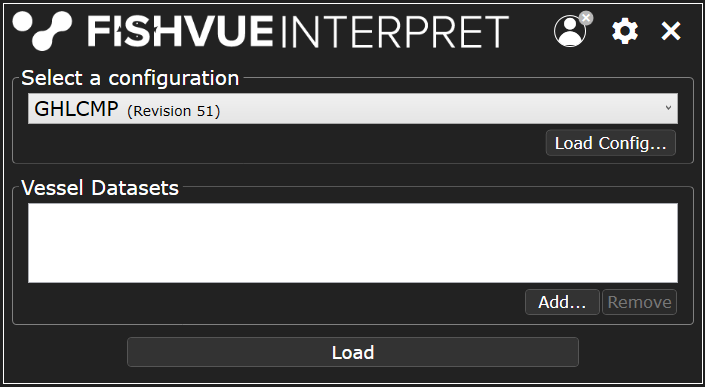
Click Add, then navigate to the location of the data set (for example, C:\Users\Desktop\123456.zip). Select the file and click OK.
Loading multiple data sets
Some vessels use multiple hard drives for a single trip. The sensor data sets from each drive can be loaded into FishVue Interpret to display one continuous data set.
To load multiple data sets from the same vessel and trip:
- Click Add for each additional data set.
- Select the file and click OK.
Each loaded data set will appear in the window.

NOTE: The order in which you load data sets does not matter. FishVue Interpret always displays the data in chronological order.
For data sets from the EM Observe system, FishVue Interpret first checks that the Vessel Setup files are consistent between the data sets. If it finds any inconsistencies, it lists them and asks whether you want to continue. This step helps confirm that you’ve loaded the correct data sets.
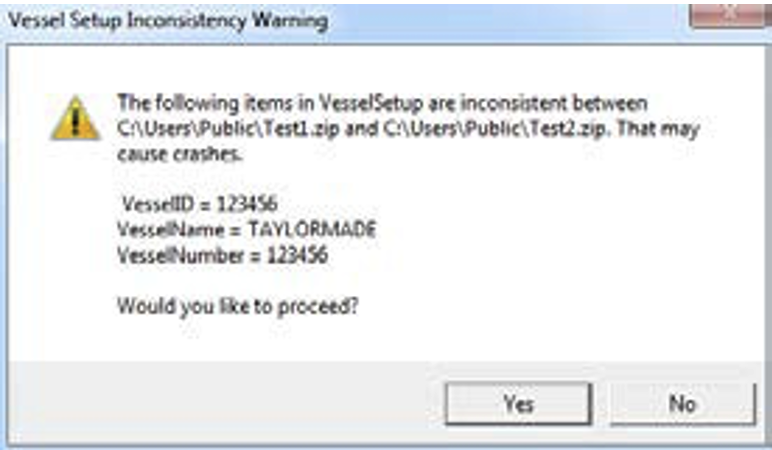
If you choose to proceed despite inconsistencies, there may be unintended consequences. Some may be minor (for example, a difference in UTC offset).
Once the data sets are selected, click OK. The data will begin loading. Depending on the file size, this may take some time.
- If the data set includes a VesselSetup.txt file, the data will load normally.
- If the data set does not include a VesselSetup.txt file, the Vessel ID dialog will appear (FishVue Interpret Pro only).
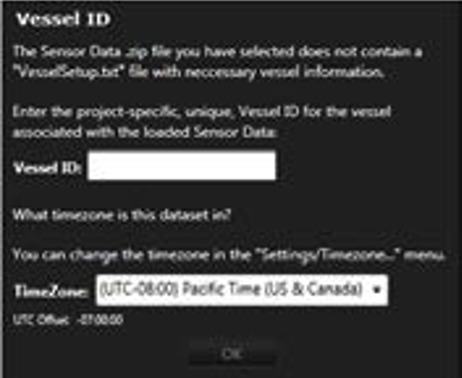
In the Vessel ID field, enter the unique vessel name or number used to identify the vessel. Annotations from multiple data sets are linked to this Vessel ID, so it’s important to use the same value consistently. When you’re finished, click OK to continue.
As the data loads, it is normal for some errors to occur. When loading is complete, the EM Data box shows how many errors, if any, were detected during parsing.
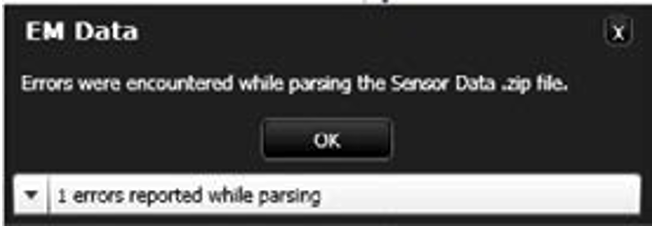
If you want to review the errors, click the down arrow for more details; otherwise, click OK to continue.
Once the data set has finished loading, the main FishVue Interpret screen appears and you are ready to review the EM data.
2.1.3 Managing Configurations
NOTE: Managing configurations is an advanced feature that is only available in FishVue Interpret Pro. This feature is not supported in FishVue Interpret Lite.
In FishVue Interpret versions 2.0 and earlier, each fishery or project-specific configuration was installed as its own application. Starting with version 2.2, FishVue Interpret uses a single standard platform and installer, which can be customized with a configuration profile for each fishery. These profiles are provided by the Archipelago EM project manager and applied by the FishVue Interpret Pro user. This standardized approach improves stability, simplifies troubleshooting, and gives users more flexibility.
Installing a Configuration Profile
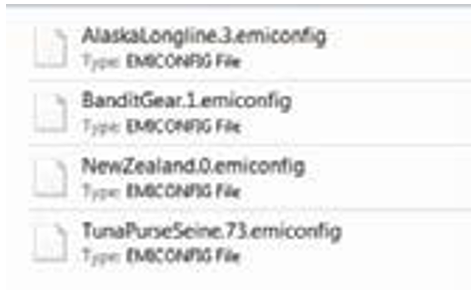
To install a configuration in FishVue Interpret, you need two items: the generic FishVue Interpret installer (.msi file) and the configuration file (.interpretconfig file). Both are provided by your Archipelago EM project manager.
The first time you launch FishVue Interpret, it opens with the default configuration package. You must then load the custom configuration package created for your fishery (as described in the next section).
NOTE: If your configuration package is stored in the same folder as the installer, it will be detected and installed automatically when you run the installer.
Adding or Updating a Configuration
You can add a new configuration or update an existing one with the following procedure. To add or update a configuration:
- Start FishVue Interpret, and from the Settings menu, choose Manage Configurations.
- Click the Install/Update Configuration button (located at the top right-hand side of the window).
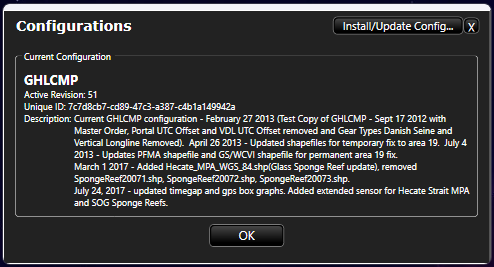
- Select the “.Interpretconfig” configuration file (provided to you by your Archipelago EM project manager) for the new or updated configuration and click Open.
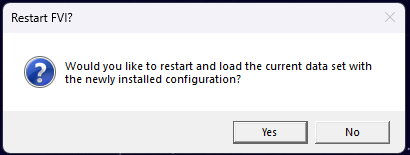
- You will be prompted to restart FishVue Interpret with the new configuration. Click Yes to proceed using the new configuration.
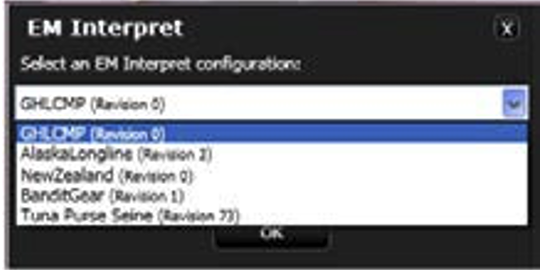
Choosing from Multiple Configurations
If more than one configuration has been installed, FishVue Interpret will prompt you to select which configuration to use for the selected data set at start-up. (The last chosen configuration is selected by default.) You can then choose which configuration to use.
To activate a configuration (after a data set has been loaded):
- From the Settings menu, choose Manage Configurations. A list of available configurations is displayed.
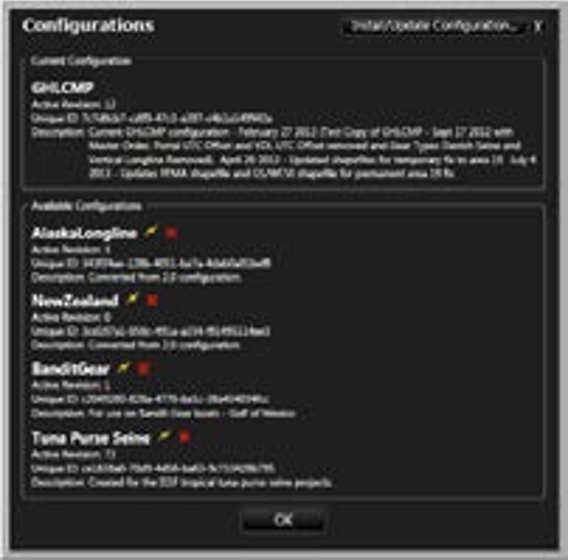
- In the list of available configurations, select the one to load by clicking the lightning bolt icon beside its name. FishVue Interpret will re-start with the selected configuration.
Activating a Different Revision of a Configuration
When you load a new revision of an installed configuration (using Install/Update Configuration), it automatically becomes the active revision for that configuration. If you need to use an earlier revision (for example, when loading and editing a legacy .interpret file), you can activate that revision directly in FishVue Interpret.
To activate a different configuration revision:
- From the Settings menu, choose Manage Configurations.
- For the configuration you want to change, expand the Archived Revisions of [configuration name] section. This section appears only if multiple revisions of that configuration have been installed.
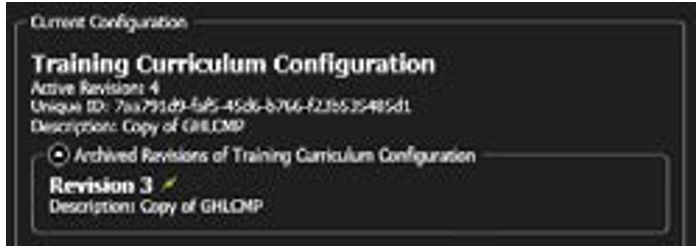
- In the list of available revisions, select the one to activate by clicking the lightning bolt icon beside its name.
- FishVue Interpret will verify that you would like to restart with the selected revision. Click OK to proceed.
The selected revision becomes the active version for that configuration and remains the default until you install a newer revision or manually activate a different one.
2.1.4 Ending Your FishVue Interpret Session
Once you’ve finished working, you can exit FishVue Interpret.
To quit FishVue Interpret:
- From the File menu, choose Exit.
- If you have created any notes or annotations (see Using Notes and Creating Annotations), you will be prompted to save your work.
- To save your edits now, click Yes and choose where to save your notes or annotations.
To return to the program without saving, click Cancel, then use File > Save Notes or File > Save Annotations when you’re ready to save. 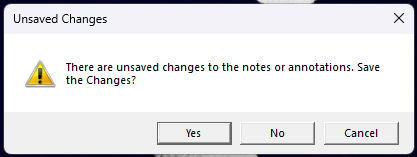
 Previous Chapter
Was this article helpful?
That’s Great!
Thank you for your feedback
Sorry! We couldn't be helpful
Thank you for your feedback
Feedback sent
We appreciate your effort and will try to fix the article